The method is similar to storyboarding, but I find it to be even more visually useful. Everyone has different things that work for them; this is just something that seems to work well for me. Take from it what you will.
You start out with a whiteboard that has been divided (use permanent marker, it makes life easier) into a number of squares. You want the squares to be around 5" by 5" so there is plenty of room. Each square represents one chapter.
Then you go to the office supply store (such a dangerous place!) and get a whole bunch of colored Post-Its. Amy recommends the Super Sticky kind, because regular ones will start to fall off after you move them around a couple times. Some of my Super Sticky ones started falling off anyway, so your mileage may vary.
You're going to be using the Post-Its on the board to help you figure out your storyline. If you know this scene comes before that plot point, you can arrange them in roughly where you think they will be, and you can always move them around later as you need to.
Use notes stacked on top of each other to denote separate scenes. "Scene" is sort of loose here—I mostly used it to mean changes in setting, but if the action moved through more than one setting I counted it as one scene.
Figure out what you want your colors to mean. I used the following colors:
- Green = setting. This is just a note to myself saying where the scene is taking place.
- Pink = scene contains female main character's point of view
- Blue = scene contains male main character's point of view
- Yellow = Subplot #1
- Purple = Subplot #2
- Orange = something important to the main plot
- Red = blood, sex, or death (hey, it's a vampire novel)
 Since I already had a working draft, I used the whiteboard to lay out where my novel was currently. I'd already started the revision, so the first two rows (chapters 1 to 8) were pretty well fleshed out. You can see that I left a bunch of white space in the third row. I knew that part needed a lot of revision, and I only had a little idea of what needed to be there (hence the two scenes in that row). You also might notice that a number of scenes are on the line between chapters. This is because the scene starts in one chapter and continues into the next.
 As I kept revising and breaking longer chapters in to several shorter ones, I would update the whiteboard and also consult the Post-Its to see what I was short on. One thing I could see was a serious lack of yellow, purple, and blue in the middle. Now, I didn't need a lot of blue for this story, but I wanted to sort of check in between the blue section at the beginning and the blue section near the end. Here you can see I've added a little to the beginning of row three and made a few notes that I haven't found a place for yet down on the bottom row.
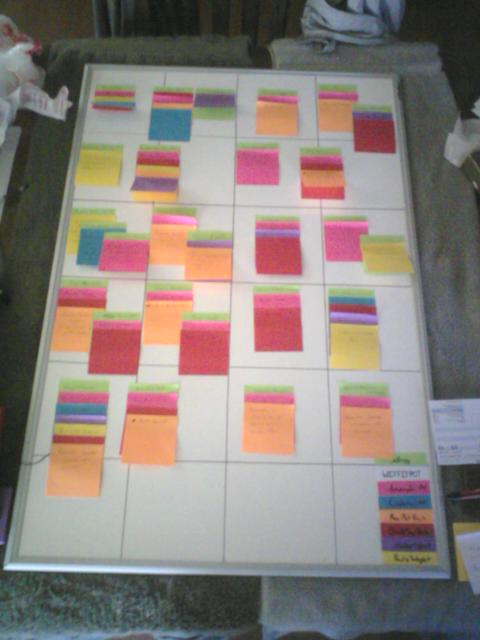 After much staring at the whiteboard and scribbling notes, I've found places for the scene bits I came up with previously, and filled in row three. Row four's been modified a little, and I've found places to add in the blue, yellow, and purple I was looking for. The red seems to be nicely distributed.
 Then it was on to breaking up my super long chapters at the end. The old manuscript was 15 chapters; the new one ended up being 28. At this point I've got 24, and I've realized I'm going to have to add a chapter into row three. I also need more yellow at the end. In fact, I end up adding a whole bunch to that subplot, which rocked.
 Finally, I've got all 28 chapters laid out. I can see that the subplots and the red bits are fairly evenly distributed. Now, as I move into the tweaking and editing stage, I make one more tool to help me. Like a cheat sheet for my novel, I make a document where each chapter is reduced to one line of text which contains the date in story-time (the novel takes place in 1999), the chapter word count, a brief summary, and what color Post-Its I used (not counting green or orange). Here's an example:
"1. 3442. F 05/14/99. Introduce [list of names], world. (PK, BU, YW, PU)"
The cheat sheet lets me find a particular scene faster than the whiteboard does, and also lets me see if any of the chapters are significantly longer or shorter than the others. It also helps me keep track of story time.
Between the cheat sheet and the whiteboard, I have a detailed map of the novel to use as I move around making editorial changes. It made my revision process soooo much easier. For example, by looking at the whiteboard I could see that I needed to add a little more yellow between chapters 13 and 22. By referencing the cheat sheet, I easily found a place in the action where I could slip in an aside, and added a cut scene to chapter 16. (I thought I had taken a final pic, but apparently not.)
When I was done using the whiteboard, I taped all the Post-It stacks to blank pieces of paper and numbered the chapters. I have these in a folder in case I need to go back to them during or after the writer's workshop next month.
While I don't think I could use this method to outline, which is what Amy does (I just can't outline, I have to pants it), I absolutely love it as far as revision goes, and I intend to use it on my next project.
No comments:
Post a Comment